It has become pretty commonplace to see chickens in backyards here in Portland, Oregon. In our world of uncertainty regarding the treatment of the food we buy, it makes me feel good to be able to have a little control … Continue reading

It has become pretty commonplace to see chickens in backyards here in Portland, Oregon. In our world of uncertainty regarding the treatment of the food we buy, it makes me feel good to be able to have a little control … Continue reading
It’s that time of year again… January is the most difficult month for those of us who need more than writing out a list of resolutions to get motivated and to keep everyday life from drowning our creativity. I suffer through long, gray, cold days trying to pretend I’m content. In part, I am very content to curl up with a cozy blanket, watch Netflix and knit away the long nights. For a little while… but sometime around mid January, this grows tiresome.
I’m currently reading Elizabeth Gilbert’s latest book, Big Magic: Creative Living Beyond Fear. Ms. Gilbert makes some astute observations. “All procrastination is fear. Anything you do that stops you from the work that is gnawing at you, the work that wants to be made through you, the creative project that is begging you to realize it…anything you do that blocks that is fear. It might look like fear, but fear also has a lot of shady disguises. It can show up as perfectionism, insecurity, guilt, procrastination…all of it is something you are too scared to do.”
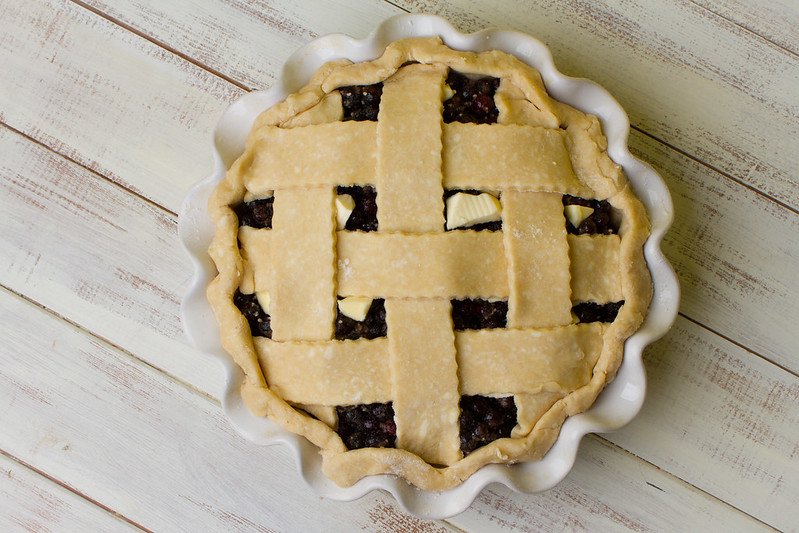
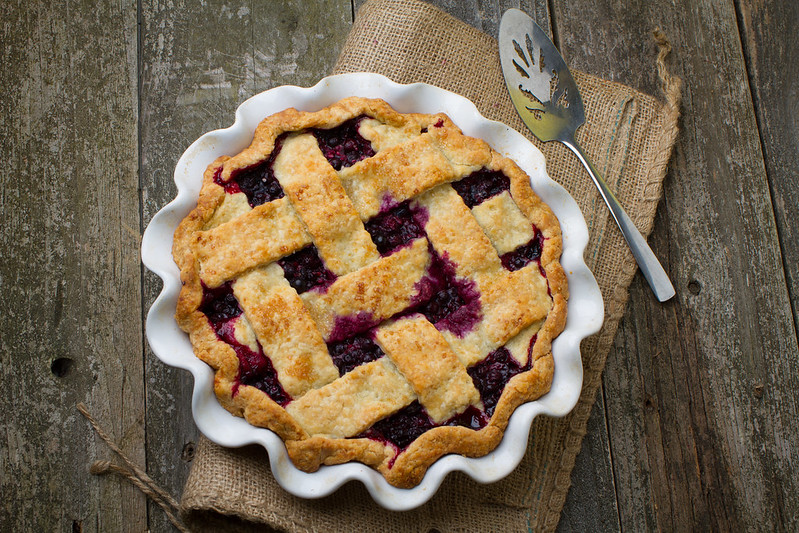
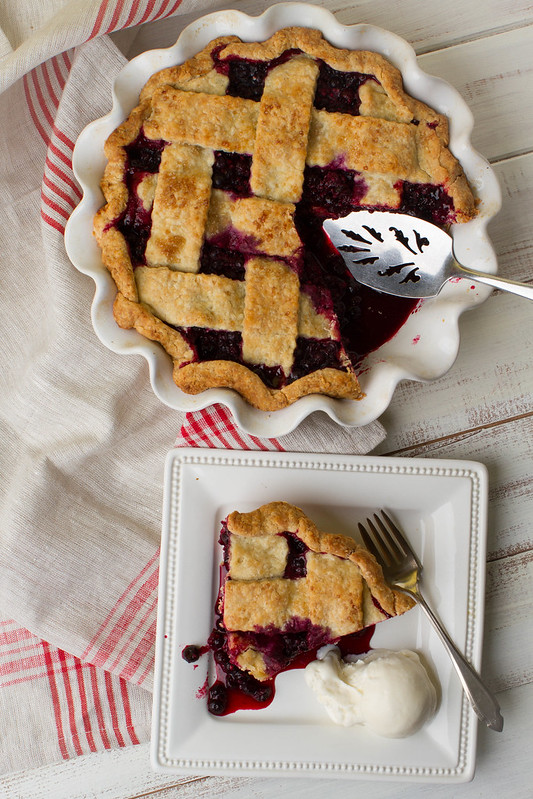
So while we patiently wait out the dark days of winter, and contemplate our fears, let’s make some pie, shall we? When life gives you lemons, you know that old saying, and since it’s not exactly lemonade season around here, pie will have to do. And this easy as pie, pie seems appropriate.

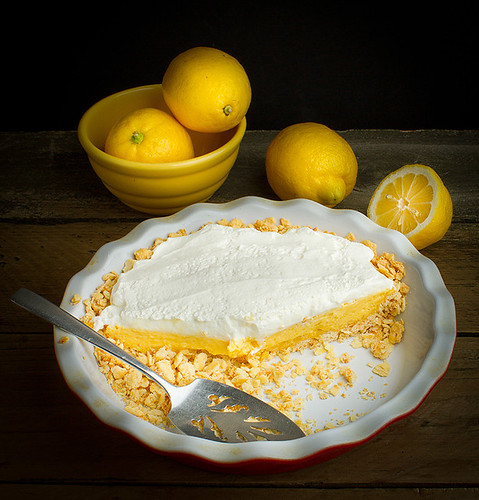
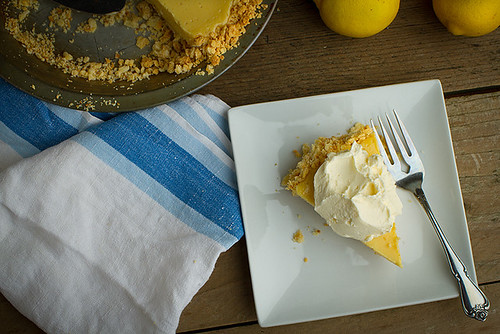
NOTES ON THIS LEMON PIE: Bill Smith’s Atlantic Beach Pie is based on a recipe for lemon pie, a staple of the North Carolina coast.

Cinnamon: spice, herb, or both?
When I posted this shot of cinnamon sticks on Google+, a lengthy discussion took place. There was a challenge going on in a photo community I belong to. The theme was ‘herbs.’ ‘Hmmmm, is cinnamon an herb?’ I wondered. I’ve always thought of cinnamon as a spice, but when I started researching it, I found that cinnamon has many characteristics of an herb as well.
A quick note to my friends at our local spice shop gave me this insight:
“We designate cinnamon as a SPICE. The terms “spice” and “herb” have both been used to describe parts of plants (possibly dried) that are used to enhance the flavor or taste of food. In addition, herbs have been used to augment cosmetics, preserve foods and cure illnesses. Spices and herbs can consist of flower buds, bark, seeds, leaves or many other parts of a plant. Over time the definitions for spices and herbs have changed a bit. In the past, spices have been categorized as fragrant, aromatic plant products like cinnamon, cloves, ginger and pepper. These spices are found in plants grown in tropical and subtropical regions of the world. While herbs have always been recognized as the more green, leafy products like mint, rosemary and thyme grown in more temperate areas.”
After taste testing cinnamon at our local spice store, Savory Spice Shop, I’ve learned a number of things I want to share with you.
There are basically two kinds of cinnamon derived from different types of trees in different parts of the world:
1. Cassia cinnamon. Obtained from the bark of Cassia trees. This is what we generally find in most supermarkets in the United States. There are a few varieties of cassia cinnamon, but each dries into the familiar scroll-like roll with a hard outer shell. The three main types of cassia are separated by region and include the following: Chinese: a notably sweet aroma; Indonesian: tends to ball and clump when added to liquid; very strong Red-Hots flavor; Vietnamese: really high percentage of essential oils, very strong.
2. Ceylon cinnamon. This is true cinnamon. Ceylon cinnamon principally comes from Sri Lanka, India, Madagascar, Brazil and the Caribbean. It looks more like a rolled cigar than a rolled scroll, and it’s flaky and brittle to touch. The flavor of true cinnamon is more smooth and complex than western varieties, often carrying notes of pine, citrus and floral. Ceylon cinnamon can be found in both organic and regular forms.
Is cinnamon a spice, herb, or both?
Another description on enotes.com:
“Herbs are the green, leafy parts of plants. They are most efficacious and flavorsome when used fresh, and they are mostly grown in temperate to hot regions. Spices are derived from any part of a plant that is not a leaf: for example, cloves are flower buds, cinnamon is bark, ginger is a root, peppercorns are berries, nigella is seed, cumin is a fruit, saffron is stigmas, cardamom is pods and seeds, and asafetida is a gum. Spices are usually used in small amounts, are best used dry (the drying process often enhances the flavor), and most grow in subtropical or tropical climates. One single plant can be both an herb and a spice. Aromatic seeds like dill are a spice, while dill leaves are an herb. However, coriander and hamburg parsley roots, garlic and fennel bulbs are all regarded as herbs rather than spices.”
Spice!
My favorite uses for cinnamon fall on the culinary side. Starbucks makes a delicious cinnamon dulce latte. I like to add cinnamon to coffee grounds to give my morning coffee a little spicy kick. There’s cinnamon coffee cake, cinnamon rolls, cinnamon and sugar toast. Berry pies always benefit from a bit of cinnamon in the filling and sprinkled on top before baking. I’m so grateful to have access to pure cinnamon at my local spice store, Savory Spice Shop.


There you go… probably way more than you ever wanted to know about cinnamon. From now on I’ll be buying cinnamon in it’s purest, true form.

NOTE: I’m reposting a few of my favorites from PortlandPeeps onto this blog for safe keeping. This was originally posted in February 2012.
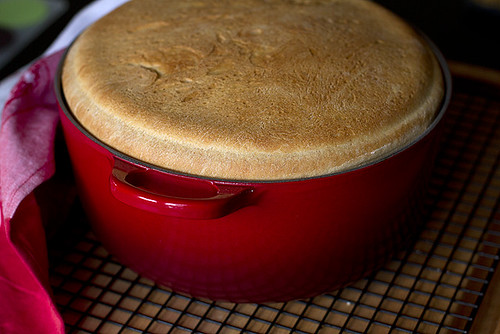
I never tire of the stories my husband shares about his childhood. When he was just ten years old, his father died unexpectedly, leaving his mother with four young children. In spite of the hardships that followed, many of my husband’s fond memories revolve around the delicious homemade foods his mother made. One of those memories was of a shepherd’s bread, and the tradition his family practiced whenever it was served. This slightly sweet bread was baked in a cast iron Dutch oven, leaving circular indentations from its lid on the top crust. Before my mother-in-law served this bread to her family, she gave their loyal border collie the first slice.
When I asked my mother-in-law for this family recipe, she included a 1976 article from Sunset magazine where I learned about its history. Her shepherd’s bread was originally baked by the Basques, people who live in a tiny region that straddles the border of Spain and France.
“Tending their flocks in the remote Western rangelands, Basque sheepmen had to cook for themselves, and they had to make do with a minimum of portable cooking equipment. A Dutch oven became essential for cooking hearty soups and stews — and even for baking bread. They buried the pot in a pit full of hot embers.”
“A poignant camp custom: Before serving, a herder would slash the sign of the cross on top of the loaf, then serve the first piece to his invaluable dog.”
Many years later, some Basques still bake these dome-shaped loaves of bread, but now they do so at home in their conventional ovens. The recipe my mother-in-law used was one that was supplied to Sunset magazine by Anita Mitchell. Anita won the bread-baking championship at the National Basque Festival in 1975.
To make this bread, you’ll need a 10-inch covered Dutch oven (I used my 5.5 quart Le Creuset).
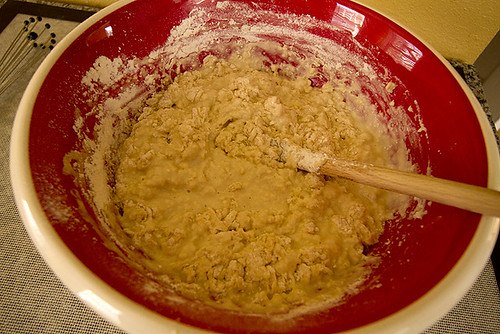
Mixing ingredients for bread dough is so satisfying! If you look closely, you can see bubbles from the yeast mixture working its magic.

This is after the second kneading, and before the dough rises slightly higher than the Dutch oven lid.
This is what the bread should look like when you take it out of the oven. Tap the bread. Does it sound hollow? It’s done!
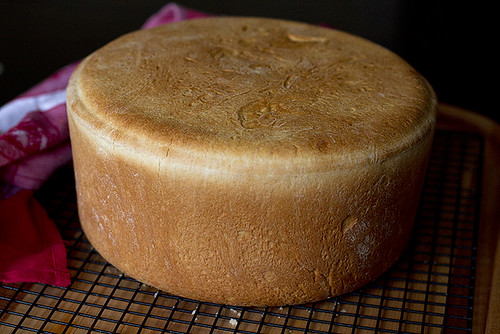
If you used a cast-iron Dutch oven, you’ll have circles from its lid on the top of your loaf, which would make this even more beautiful!

My favorite part! Bailey got the first slice. She’s so cautious — she sniffed it, licked it, gently took it from my daughter’s hand, then placed it on the porch and looked up at Isabel with those sweet, innocent brown eyes as if asking for permission to eat it.
Here’s the recipe:
Sheepherder’s Bread
Makes 1 very large loaf
3 cups very hot tap water
1/2 cup butter
1/2 cup sugar
2 1/2 teaspoons salt
2 packages active dry yeast
About 9 1/2 cups all-purpose flour
1 Tablespoon vegetable oil
In a large bowl, combine the hot water, butter, sugar and salt. Stir until butter melts. Let cool to warm (110° to 115°F) Stir in yeast, cover and set in a warm place until the mixture is bubbly, about 15 minutes.
Add 5 cups of the flour and beat with a heavy-duty mixer or wooden spoon to form a thick batter. Stir in enough of the remaining flour (about 3 1/2 cups) to form a stiff dough. Turn dough out onto a floured board and knead until smooth, about 10 minutes, adding flour as needed to prevent sticking. Turn dough over in a greased bowl, cover and let rise in a warm place until doubled in size, about 1 1/2 hours.
Punch down dough and knead on a floured board to form a smooth ball. Cut a circle of foil to cover the bottom of the Dutch oven. Grease the inside of the Dutch oven and the underside of the lid with vegetable oil.
Place dough in the pot and cover with the lid. Let rise in a warm place until dough pushes up the lid by about 1/2 inch, about 1 hour (watch closely).
Bake, covered with the lid in a 375° oven for 12 minutes. Remove lid and bake for another 30-35 minutes, or until the loaf is golden brown and sounds hollow when you tap it. Remove from oven and carefully turn loaf out onto a rack to cool.

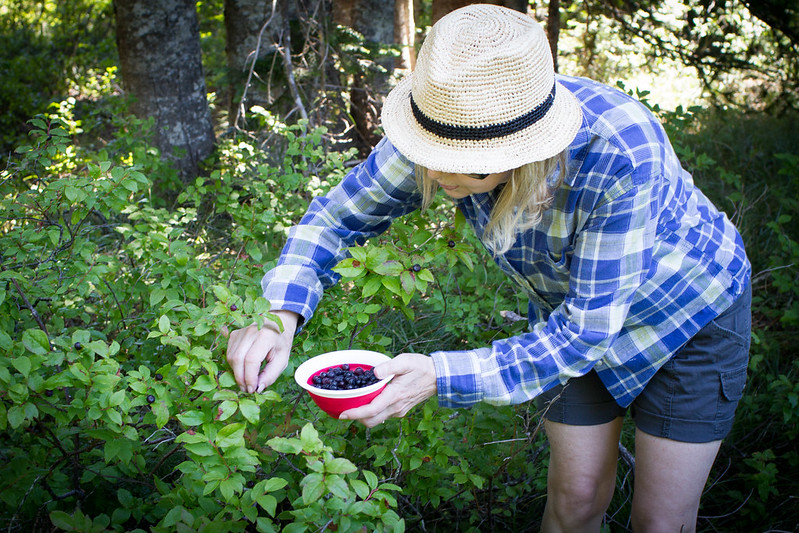
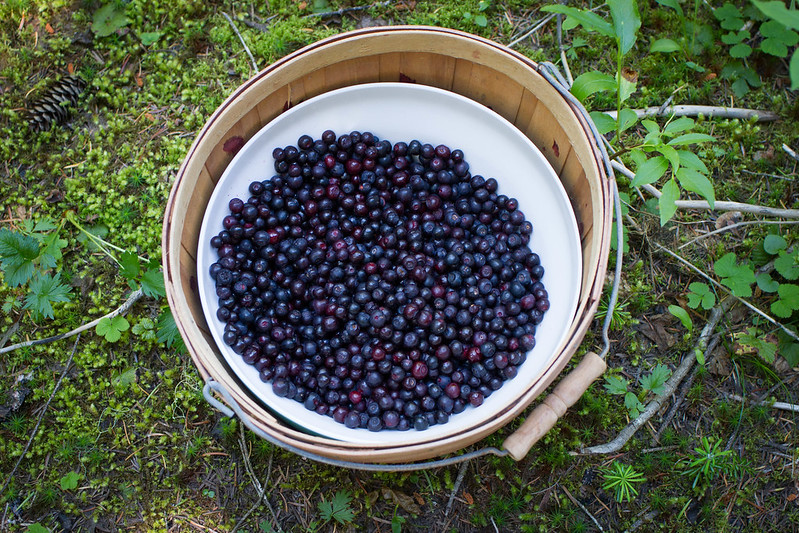
I found this unpublished post this morning, and why not? I’ll post it now. Prime huckleberry picking is in August, so plan ahead. I’m not eager to share our perfect spot, but you’re welcome to bribe me. Who knows, in the right mood, I may share.
While campering near Mt St Helens last summer, huckleberries were the motivating factor for our destination. We had heard about huckleberry fields filled with crowds of eager pickers, car lined roads to navigate, so we weren’t holding out hope that we would be successful in our goal of coming home with enough berries for a pie. But miracles do happen, and we arrived at a spot where the only other creatures in the vicinity were the black bears that live in the nearby forest (well, we didn’t actually see any… but I’m sure they were keeping a close eye on us).
Silence. We spent two days and a night here. Alone. And pick huckleberries we did! These are small, tasty berries, much smaller than a blueberry and take hours to fill a tiny container.
This is for all my non-dairy eating, vegan, ice cream addict friends. Thanks to this easy recipe, you can all enjoy the same creamy deliciousness you crave. You’re welcome.
Ingredients
2 Cups almond milk
2 Cups French vanilla creamer
1/2 Cup sweetener (honey, sugar)
1 Vanilla Bean (or 2 tsp pure vanilla extract)
2 Tablespoons cornstarch
2-3 Tablespoons unsweetened cocoa
2 Ounces dark chocolate bar, (such as Ghirardelli 86% cacao) chopped
Directions
1. Put almond milk and French vanilla creamer into a medium-size saucepan and whisk in the sweetener.
2. Slice the vanilla bean in half to extract the seeds from inside. Place the seeds and the pod into the saucepan.
3. Place the mixture on a medium heat and allow it to simmer for five minutes.
4. Remove the pan from the heat, and extract around 1/4 cup from the pan. Mix this with the cornstarch in a small bowl. Then mix that back into the pan, and whisk it to infuse. Cover, and allow the mixture to sit for twenty minutes.
5. Cool the mixture until cold. Remove vanilla bean.
6. Churn mixture in an ice cream maker for 20 minutes.
7. Add 3-4 Tablespoons unsweetened cocoa and dark chocolate, chopped. Churn for an additional 5 minutes.
8. Freeze for several hours before serving.
You can delete the chocolate additions and add anything your heart desires. Fresh berries would be good! Enjoy!
The holidays are over. Heavy sigh. I feel a bit cheated due to the fact that our real break (after Christmas) was only just beginning when nasty viruses hit. My Mother, who lives nearby, came down with what seemed like the flu. A week later, she showed little improvement, so I took her into urgent care on New Year’s Day. Diagnosis: bronchitis. Prescription: antibiotics. Simultaneously, at our house, my husband and daughter were fighting off similar bugs. Somehow through nursing these three back to health, delivering Pedialyte, cough meds, homemade chicken soups, and components of the BRAT diet (bananas, rice, applesauce, and tea) to all, I managed to stay well! I can’t even believe I dared to type that!
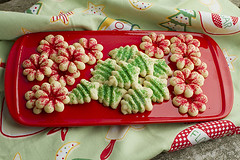
In years past, my Mother and I have closed ourselves up in her kitchen for an entire day, baking and decorating a variety of holiday cookies. Since ‘simplicity’ was tagged as my word for December 2014, and I would be baking on my own this year, two or three kinds of cookies seemed more manageable. Three days, 250+ cookies, and many rounds of clean up later, I emerged, tired and grumpy. Next year… seriously!
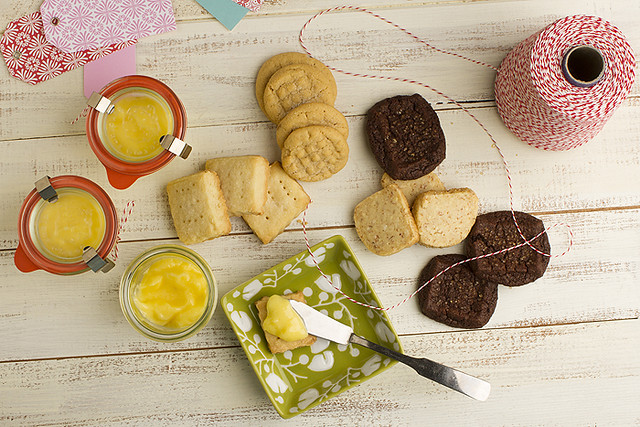
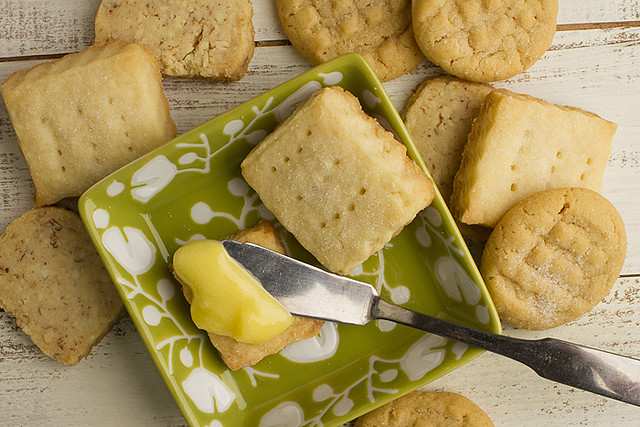
By some gravitational pull… ahem, butter… this year’s cookie theme was shortbread. You know what goes really great with shortbread? Lemon curd. Now as a rule, I’m not a huge fan of lemon desserts, but this lemon curd, made with Meyer lemons, is nothing short of phenomenal! Meyer lemons tend to be sweeter than regular lemons, and lack the eye-tingling punch of acid of regular lemons, so they bring a refreshing flavor to this curd. Meyers come into season during mid-winter, so grab them up while you can. If you’re a big lemon fan, by all means use regular lemons instead. Or mix it up and use a few of each. Either way, this is one badass lemon curd!
Add the buttery flavor and sandy texture of shortbread, with the creamy tartness of lemon curd, and you have a combination that will have you sneaking out to the kitchen after guests have gone to savor every last drop.
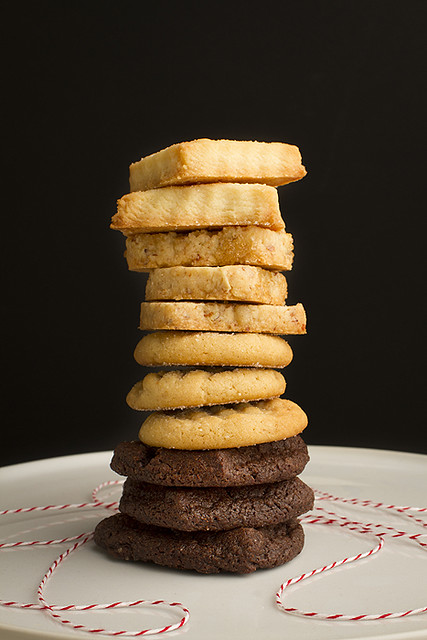
I actually made four kinds of shortbread… chocolate, peanut butter, almond and vanilla.
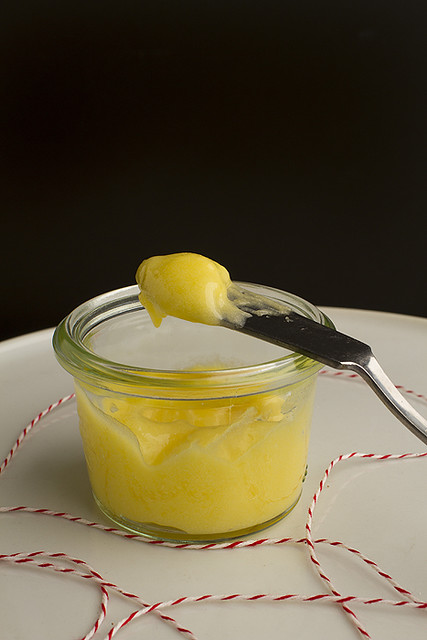
You may be under the impression that lemon curd is difficult to make, but trust me, this is easy. And that step of straining it through cheesecloth you may have heard about? non-existent!
I found these perfect boxes at The Container Store early in the season.
Note to self: pick up plenty of boxes early, even if you think you won’t need them (you will).They won’t be there when you return to buy more.
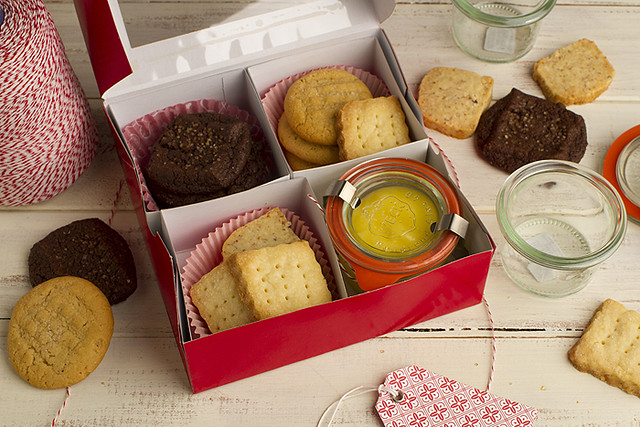
The challenge was finding small jars for the lemon curd that would fit nicely into those perfect boxes. Thankfully, the wonderful people at Weck had me covered. Their 2.7 oz jar was a Cinderella fit. Be careful, Weck jars are addicting!

Lemon Curd
Makes about 2 cups
This recipe easily doubles. I made 4 cups to fill 12 jars, and still had some left over.
Ingredients
3 oz. (6 Tbs.) unsalted butter, softened at room temperature
1 cup sugar
2 large eggs
2 large egg yolks
2/3 cup fresh lemon juice (about 4 lemons) I used Meyer lemons (see notes on that above)
1 tsp. grated lemon zest (optional)
Directions
In a large bowl, beat the butter and sugar with an electric mixer, about 2 min. Slowly add the eggs and yolks. Beat for 1 min. Mix in the lemon juice. The mixture will look curdled, but it will smooth out as it cooks.
In a medium, heavy-based saucepan, cook the mixture over low heat until it looks smooth. (The curdled appearance disappears as the butter in the mixture melts.) Increase the heat to medium and cook, stirring constantly, until the mixture thickens, about 15 minutes. It should leave a path on the back of a spoon and will read 170°F on a thermometer. Don’t let the mixture boil.
Remove the curd from the heat; stir in the lemon zest. Transfer the curd to a bowl. Press plastic wrap on the surface of the lemon curd to keep a skin from forming and chill the curd in the refrigerator. The curd will thicken further as it cools. Covered tightly, it will keep in the refrigerator for a week and in the freezer for 2 months.
While scanning through the many holiday cookie recipes on Pinterest, I was pondering what makes a cookie worthy of gifting. What do I want to nosh on? My criteria is relatively simple. As with any dessert, texture is extremely important. Soft, cakey, textured cookies are good. Slightly crisp and sandy is awesome too. Brightly colored dough is not appealing, although a few colored sanding sugars are nice. The taste should not be overly sweet. Buttery is good. Chocolate is crucial. Size is important. Smaller is better, a few bites is best. As with any baked goods, the best ingredients are of utmost importance… pure butter, good chocolate, real vanilla, fresh eggs, etc. Starting with only the finest, purest ingredients is key to producing delicious cookies every time.
Here is the list of cookies I have rotated in the last few years. In an effort to simplify and reduce holiday stress, I’m choosing two or three varieties this year. And due to their complexity, some of these will automatically disqualify.
Recipes are below the descriptions.
Butter Cookies. Buttery goodness. One recipe, two different cookies.

Cut-outs. This recipe is a two for one. One batch of butter cookie dough makes both spritz and cut-outs.
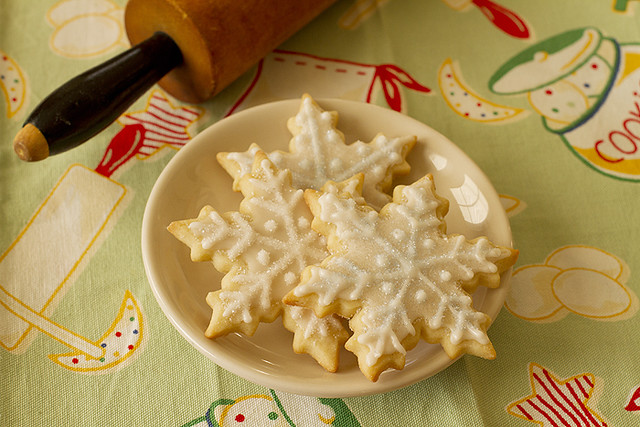
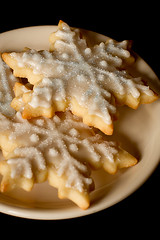
Double Chocolate Snowflakes. Soft, chocolately cookies with a cake-like interior.
Pecan Tassies. Miniature pecan pies. A bit of work, but worth the extra effort.

Gingersnaps. Spicy, sweet, soft. Yum.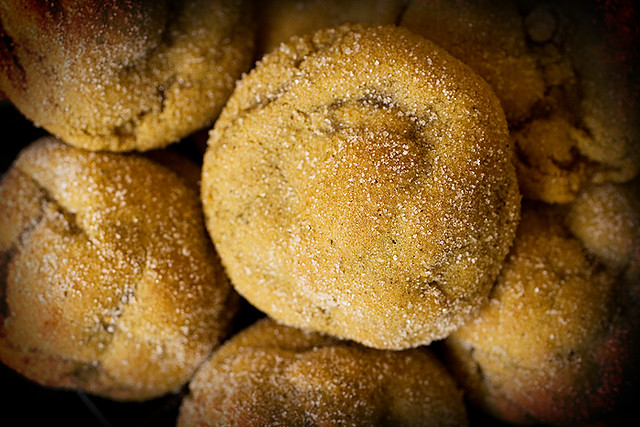
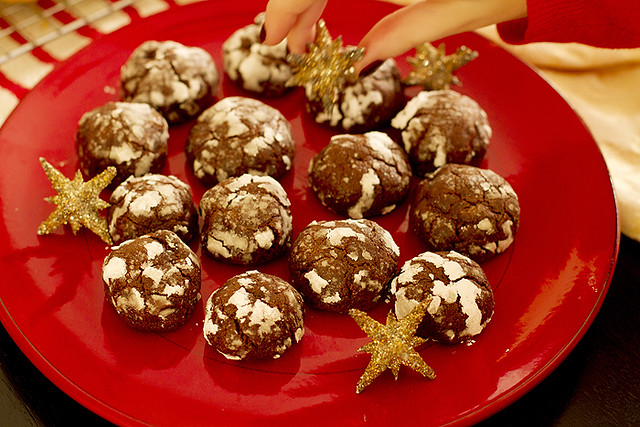
World Peace Cookies. The name says it all. If we could all eat these every day, there would be peace in the world. If you love dark chocolate, this slightly crisp, sandy textured cookie will float your boat.
Chocolate Chip Cookies. Made with cake flour and chunks of dark chocolate, these are small, dense, and extra special.
THE RECIPES
Notes:
• Butter = unsalted butter, unless otherwise noted
• I like to splurge on good chocolate. Guittard, Ghirardelli, Scharffen Berger are good.
• All cookies listed are baked in a 350 degree F oven.
• It is better to underbake than overbake cookies. Take them out of the oven while they’re still a bit soft, and butter and sugar cookies should still be very light.
Butter Cookies
2 Cups (4 sticks) unsalted butter, room temperature
2 cups sugar
2 large eggs
2 Tablespoons pure vanilla extract
2 teaspoons salt
5 cups all-purpose unbleached flour
In the bowl of an electric mixer fitted with the paddle attachment, cream butter and sugar on high speed until light and fluffy, about 5 minutes.
Add eggs, vanilla, and salt; mix on medium speed until combined.
With mixer on low speed, add flour in 2 batches, mixing just until it’s incorporated.
Divide dough into two equal portions. Place each on a piece of plastic wrap, flatten into disks. Wrap in plastic wrap; refrigerate until firm, or at least 2 hours or up to 1 week.
Take out one disk and let it get to room temperature before putting it through a spritz cookie press. Use same baking instructions as above for cut-outs.
Cut-outs
When you’re ready to bake, roll out the other disk to about 1/4 inch thick and cut out desired shapes. Place onto a cookie sheet, sprinkle with sanding sugars. Bake in preheated oven for about 12 minutes, or until they’re slightly golden just around the edges.
Cool cookies overnight before frosting.
Icing
For spreading:
Makes about a cup, enough to coat 1 recipe’s worth of 1/8-inch thick cut out cookies.
In a bowl, still until smooth: 3 cups powdered sugar, 1 teaspoon vanilla, 1/4 cup water
To tint, stir in food coloring, a few drops at a time.
Icing should spread evenly, and after a second, settle to make a smooth surface. If too thick, mix in a few drops of water; if too thin, stir in powdered sugar, a little at a time.
Spread icing onto cool cookies with a metal spatula. Let stand until icing is firm, about 1 1/2 hours.
For piping:
Makes about 3/4 cup, enough to decorate 1 recipe’s worth of 1/8-inch thick cut out cookies.
In a bowl, stir until smooth: 2 cups powdered sugar, 1/2 teaspoon vanilla, 1 1/2 Tablespoons water
To tint, stir in food coloring a few drops at a time. Icing needs to be still enough to hold a line when piped through a pastry bag fitted with an 1/8-inch tip. If too thick, mix in a few drops of water; if too thin, stir in powdered sugar, a little at a time.
Let stand until icing is firm, about 5 minutes.
__________________________________________________________________________________
Double Chocolate Snowflakes
1 1/2 cups flour
3/4 cup cocoa powder
2 teaspoons baking powder
3/4 teaspoon salt
1 stick butter
3/4 cup brown sugar
1/4 cup granulated sugar
2 eggs
1 teaspoon vanilla
1 1/4 cups chocolate chips
Combine flour, cocoa, baking powder, salt
Cream butter, add sugars
Add eggs and vanilla. Mix well.
Add flour mixture and mix until a soft dough forms.
Add chocolate chips and mix well.
Cover dough and chill for at least an hour.
Shape dough into balls and roll in powdered sugar.
Bake in a preheated 350 degree oven until cookies have puffed and cracked. About 8-10 minutes.
__________________________________________________________________________________
Gingersnaps
1/2 cup butter
2 cups sugar
2 eggs
1/2 cup molasses
4 cups sifted flour
2 teaspoons soda
2 teaspoons cinnamon
2 teaspoons ginger
Cream butter and sugar together, beat in eggs.
Stir in molasses.
Sift in all dry ingredients. Mix into dough.
Roll dough into 1″ balls. Roll in sugar (cinnamon optional).
Bake at 350 degrees for 7-10 minutes.
__________________________________________________________________________________

World Peace Cookies (Chocolate Chunk Butter Cookies with Sea Salt)
1 1/4 cups all-purpose flour
1/3 cup unsweetened cocoa
1/2 teaspoon baking soda
1/2 cup (1 stick) plus 3 Tablespoons unsalted butter, at room temperature
2/3 cup firmly packed light brown sugar
1/4 cup granulated sugar
1/2 teaspoon fleur de sel or 1/4 teaspoon fine sea salt
1 teaspoon pure vanilla
5 ounces bittersweet chocolate, chopped into chips, or a generous 3/4 cup mini-chocolate chips
Sift the flour, cocoa and baking soda together.
Working with a stand mixer, fitted with a paddle attachment, or a hand mixer in a large bowl, beat the butter on medium speed until soft and creamy. Add both sugars, the salt and vanilla and beat for 2 minutes.
Pour in the dry ingredients (drape a towel over the mixer to protect yourself from flying flour) and pulse the mixer at low speed about 5 times for a second or two each time. Take a peek; pulse a few more times if there’s a lot of flour still on the surface of the dough. Mix on low speed for about 30 seconds more until the flour disappears into the dough. Work the dough as little as possible for the best texture. Don’t be too concerned if it looks a little crumbly. Toss in the chocolate pieces and mix to incorporate.
Turn the dough onto a work surface. Gather it together and divide in half. Shape each half into a log that is 1 1/2 inches in diameter. Wrap the logs in plastic wrap and refrigerate for at least 3 hours.
Preheat oven to 325F degree
Line two baking sheets with parchment or silicone mats.
Using a sharp, thin knife, slice the logs into rounds that are 1/2 inch thick. Arrange the rounds on the baking sheets, leaving about 1 inch between them.
Bake one sheet at a time for about 12 minutes. The cookies won’t look done or be firm, but they’ll firm up and become more sandy-crumbly as they cool.
__________________________________________________________________________________
Chocolate Chip Cookies
2 3/4 cups bread flour
1 teaspoon baking soda
1 teaspoon salt
1 cup butter, softened
3/4 cup sugar
3/4 cup brown sugar
2 teaspoons vanilla
2 large eggs
Sift together baking soda and salt. Set aside.
Soften butter. Add sugars and mix until smooth and fluffy.
Add vanilla and eggs. Mix well. Add flour mixture and blend.
Add chocolate chips. Mix.
Bake in a preheated 350 degree oven for 10-12 minutes.
__________________________________________________________________________________
Happiest of holidays to you all!
Squash soup is as fall as colorful leaves, apple cider, pumpkins. And even though the leaves have been blown by the wind into disorganized piles around the yard, pumpkins replaced with holly greens and lights, squash still holds an honored spot in our local grocery stores. As long as these fruit-like vegetables stick around, I will turn them into soup… Bwahaha
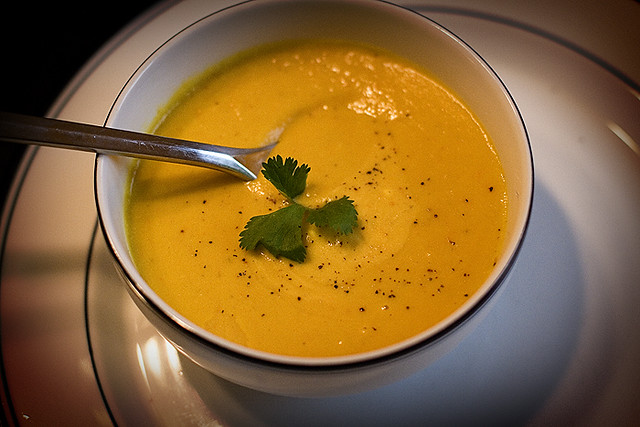
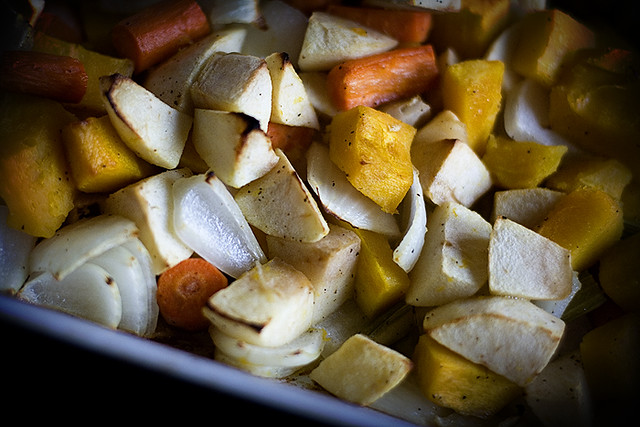
Roasted Delicata Squash Soup
INGREDIENTS
3 to 4 pounds squash, peeled and seeded (I use Delicata, but if you can’t find that, Butternut works too)
2 yellow onions
2 McIntosh apples, peeled and cored
3 tablespoons good olive oil
Kosher salt and freshly ground black pepper
2 to 4 cups chicken stock, preferably homemade
1/2 teaspoon good curry powder
Scallions, white and green parts, trimmed and sliced diagonally (sprinkled on top)
DIRECTIONS
Preheat the oven to 425 degrees F. Cut the butternut squash, onions and apples in 1-inch cubes. Place them on a sheet pan and toss with the olive oil, 1 teaspoon salt and 1/2 teaspoon pepper. Divide the squash mixture between 2 sheet pans and spread it in a single layer. Roast for 35 to 45 minutes, until very tender.
Meanwhile, heat the chicken stock to a simmer. When the vegetables are done, put them through a food mill fitted with the medium blade. (Alternatively, you can place the roasted vegetables in batches in a food processor fitted with the steel blade. Add some of the chicken stock and coarsely puree.) When all of the vegetables are processed, place them in a large pot and add enough chicken stock to make a thick soup. Add the curry powder, 1 teaspoon salt and 1/2 teaspoon pepper. Taste for seasonings to be sure there’s enough salt and pepper to bring out the curry flavor.
Recipe slightly modified from Barefoot Contessa Back to Basics.
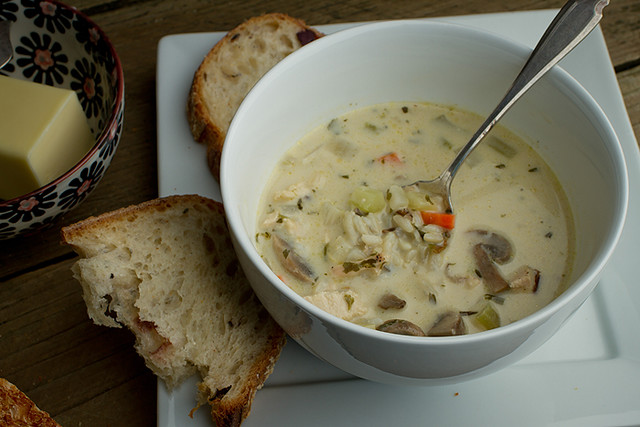
Todays soup is Chicken with Wild Rice. This chunky, hearty, soul-warming soup is a family favorite.
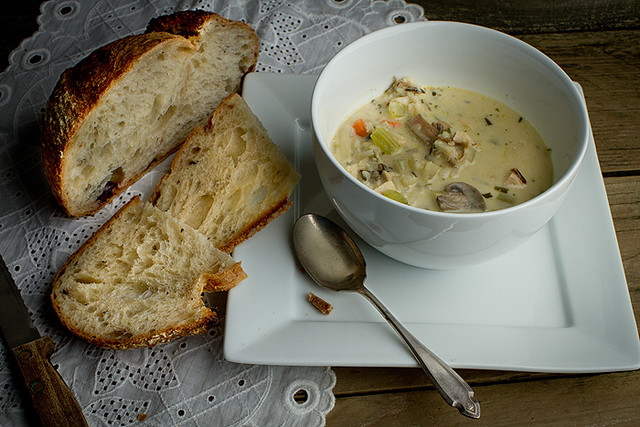
Did you know that soup was one of the first fast foods? Since it can be stretched to feed as many as necessary, it’s a great choice when you’re not sure how many people will be stopping by to eat… add a few more splashes of broth here, more vegetables there… and voila! Bowls all around.
Roasted Chicken and Wild Rice Soup
(adapted from Cooking Light)
Ingredients:
1 (6-oz) box long-grain and wild rice mix (such as Uncle Ben’s)
1 Tablespoon olive oil
1 1/2 cups red onion, chopped
1 cup chopped celery
1 cup chopped carrot
2 garlic cloves, chopped
12 white button mushrooms, quartered
1/4 cup all-purpose flour
1/2 teaspoon dried tarragon leaves
1/4 teaspoon dried thyme
2 cups water
2 Tablespoons dry sherry
32 oz fat-free, less sodium chicken broth
12 oz fat-free evaporated milk
3 cups shredded roasted skinless chicken
Directions:
1. Prepare rice according to package directions; set aside. Roast chicken, cool slightly, shred into bite size pieces; set aside.
2. Heat oil in a large Dutch oven over medium-high heat. Add chopped onion and next 4 ingredients (onion through mushrooms), and sauté for 6 minutes or until onion is tender. Lightly spoon the flour into a dry measuring cup, and level with a knife. Stir the flour, tarragon, and thyme into the onion mixture, and cook for 1 minute, stirring frequently. Add 2 cups water, sherry, broth, and evaporated milk; bring mixture to a boil. Reduce heat, and simmer for 20 minutes or until slightly thick. Stir in cooked rice and chicken; cook for 10 minutes or until thoroughly heated. Yield: Approximately 8-10 servings.