Sweet Hood Strawberries

Hood Strawberries

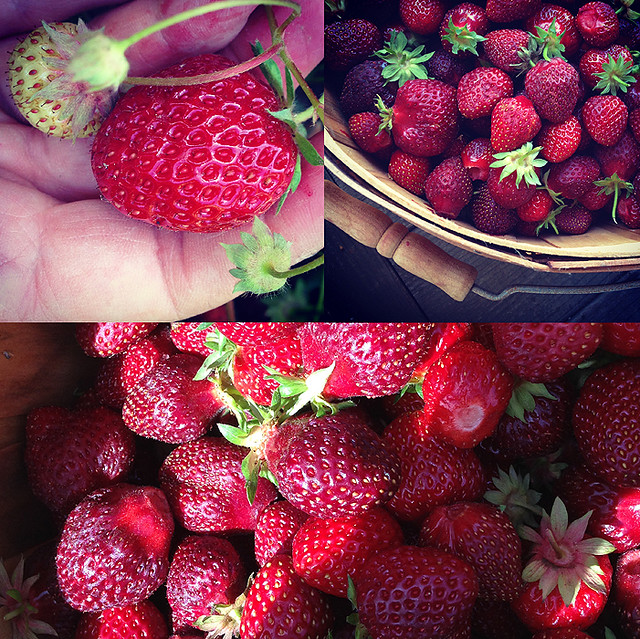
We have the best strawberries here in Oregon! Pretty sure we can attribute this to the climate… lots of rain, cool nights and warm sunny days. These are perfect conditions for growing the sweetest strawberries (the weeds in my yard seem to thrive in them as well). The berries stay on the vine and ripen slowly, allowing the sugars to surge before harvest. But these lovelies don’t last long after they’re harvested, which means you won’t see them in stores across the country. They’re very difficult to ship. I guess you’ll just have to visit Oregon to try them!

The window for Oregon strawberries (especially my favorite variety… Hoods), is so short. Sometimes I blink, and miss their quick visit. On a sunny afternoon last week, I coerced my teen into taking a drive out to a local farm with me. She had just finished high school exams for the year. I thought it might be a good way to bring her stress down a notch. An hour in the sun, talking and laughing, and before we knew it, our thoughts were lighter, and our buckets were full of these sweet red gems.

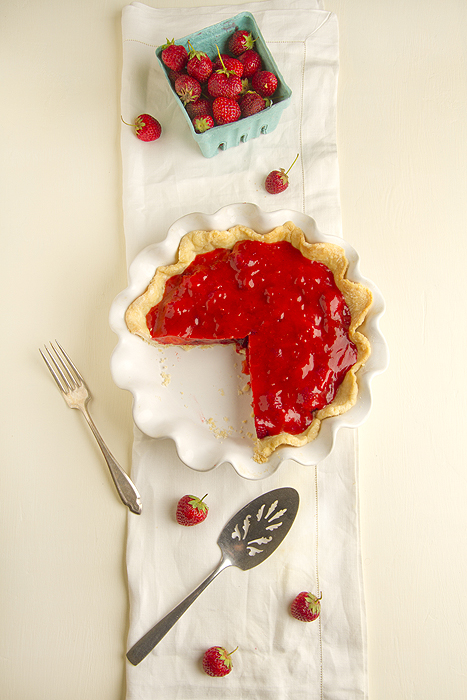
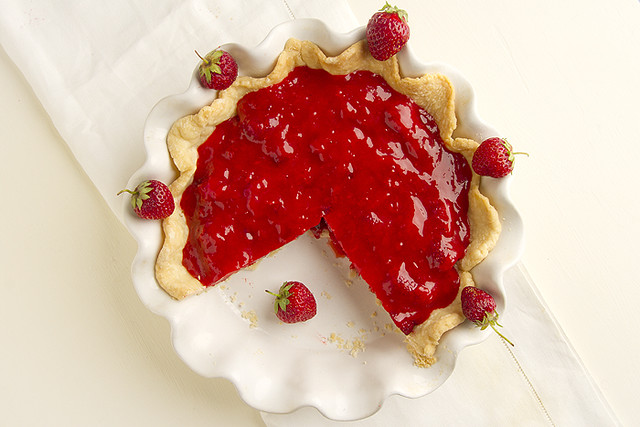
Then there was this pie…

61314SP3-107

61314SP4-108

This recipe is scribbled in a very overcrowded notebook with my other 15K or so favorites. It feels right to finally archive it here.

Strawberry Pie (recipe from my pie-baking Mother)

1 9-inch pre-baked pie crust (see detailed instructions below)
4 cups of fresh, sweet strawberries, hulled and washed immediately before use

Add about 3 cups of whole strawberries, (or however many will fit) in one layer on the bottom of the pre-baked pie crust.

In a small saucepan, bring to boil:
1 cup of crushed strawberries
3/4-1 cup granulated sugar
3 Tablespoons cornstarch
1/2 cup water

1. Boil the above ingredients for 2 minutes, or until the mixture has thickened. Add 1 Tablespoon butter. Mix and let cool.

2. Pour the glaze over the whole berries in the pie crust. Refrigerate for about 2 hours. Serve with whipped cream or ice cream.

Pie Crust (makes 1 9-inch crust)
1 cup flour
1/4 cup cold, unsalted butter, cut into small pieces
1/4 cup shortening
1/2 teaspoon salt
1 teaspoon sugar
1/8-1/4 cup ice cold water

1. Add the flour, salt and sugar to the bowl of a food processor and blend for a few seconds. Add unsalted butter pieces and pulse 4 times. Add shortening and pulse 4 more times. The mixture will look like coarse cornmeal and the butter and shortening bits no larger than peas. Add cold water and blend just until dough begins to stick together. Do not over blend.

2. Remove the dough and place it in a mound on a piece of plastic wrap. Flatten into a 4-inch disk, wrap and refrigerate for at least an hour before rolling out.

3. Sprinkle a little flour on a flat, clean work surface and on top of the disk of dough you intend to roll out. (My favorite rolling surface is a pastry cloth, but I also have a Silpat that works pretty well too). Using a rolling pin, apply light pressure while rolling outwards from the center of the dough. You have a big enough piece of dough when you place the pie dish over the dough and the dough extends by at least 2 inches all the way around.

4. When the dough has reached the right size, gently roll it onto the rolling pin. Place it into a pie plate, and simply unroll. Do not stretch the dough. Finish the edges by pressing against the edges with your finger tips or a fork.

To pre-bake the dough:

Once your crust is in the pie dish, freeze it for at least a half hour, until well chilled. This is an important step in pre-baking. Otherwise the crust will slip down the sides.
Preheat your oven to 350°F. line the chilled pie crust with parchment paper, wax paper, or aluminum foil. Fill at least two-thirds full with pie weights – dry beans, rice, or stainless-steel pie weights. Bake with weights for 20 minutes. Remove from oven, cool a few minutes and carefully remove pie weights. Poke small holes in the bottom of the pie crust with a fork and return to oven (without the weights) and cook for an additional 10 minutes, until the crust is golden brown. Cool completely before filling.

I scream, you scream…

72813IC3-107

…for bizarre flavored ice cream!

I’m not sure exactly when so many wacky ice cream flavors emerged as a trendy business model, but I first became aware of these when a friend gave me a copy of Jeni’s Splendid Ice Creams at Home. Some of Jeni’s flavors sound intriguing… Salty Caramel, Sweet Corn and Black Raspberry, Butter with Honey Hickory Pralines.

Others just sound wrong… Celery with Candied Ginger and Rum-Plumped Golden Raisins! Beet with Mascarpone Orange Zest and Poppy Seeds!

When the ice cream shop, Salt and Straw, turned up on Northwest 23rd Avenue in Portland, I joined many others in a long line for the taste experience. What sets them apart from your typical ice cream shop are their quirky, outside the box flavors that are made with local and organic ingredients. Flavors such as: Goat Cheese Marionberry Habanero, Raspberry Lemon Basil Sorbet, Pear with Bleu Cheese, and one they claimed is Oprah’s favorite, Arbequina Olive Oil. Once inside the small, retro-chic shop, customers wind through displays of vintage ice cream makers and supplies before arriving near the counter, where you are encouraged to sample before plunging into a full order. There really is no problem finding something incredible to suit your taste. Most of the flavors meld together much better than you’d expect.

Which brings me to this creamy, dreamy Strawberry/Basil delight I made a few weeks ago, but then I really couldn’t go wrong with these fabulous ingredients from my own garden… Oregon Hood strawberries, basil, and fresh eggs. You can regulate the basil flavor by soaking the leaves in the heated mixture more or less time. Personally, I loved the combination, but it won’t be everyone’s cup of tea.

73013SIC-100-Edit-2

72813IC4-105-Edit
72813IC3-142

Custom flavor creations are endless! Stick with a basic recipe, and add ingredients you like to create your own new favorites.

Strawberry Basil Ice Cream
This recipe is adapted from David Lebovitz’s formula for creating your own ice cream flavors.
Ingredients:
2 cups heavy cream
1 cup whole milk
3/4 cup granulated sugar
Table salt
1 cup tightly packed, coarsely torn basil leaves
5 large egg yolks
1 lb. fresh or frozen strawberries, trimmed
1/2 cup sugar
1-2 Tablespoons vodka (this was a suggestion from my friend Cathy at Wives with Knives) it keeps the fruit from becoming ice crystals in your otherwise creamy dessert.
Directions:
• In the bowl of a food processor, add washed, trimmed strawberries, 1/2 cup sugar and 1-2 Tablespoons vodka and puree and set aside.

• In a medium saucepan, mix 1 cup of the cream with the milk, sugar, and a pinch of salt. Warm the cream mixture over medium-high heat, stirring occasionally, until the sugar dissolves and tiny bubbles begin to form around the edge of the pan, 3 to 4 minutes.

• Stir in the basil leaves. Cover, remove from the heat, and let sit for 1 hour. Taste and let sit longer if you want a stronger basil flavor.

• Prepare an ice bath by filling a large bowl with several inches of ice water. Set a smaller metal bowl (one that holds at least 1-1/2 quarts) in the ice water. Pour the remaining cup of cream into the inner bowl (this helps the custard cool quicker when you pour it in later). Set a fine strainer on top. Whisk the egg yolks in a medium bowl.

• Rewarm the cream mixture over medium-high heat until tiny bubbles begin to form around the edge of the pan, 1 to 2 minutes. In a steady stream, pour half of the warm cream mixture into the egg yolks, whisking constantly to prevent the eggs from curdling.

• Pour the egg mixture back into the saucepan and cook over low heat, stirring constantly and scraping the bottom with a heatproof rubber spatula until the custard thickens slightly (it should be thick enough to coat the spatula and hold a line drawn through it with a finger), 4 to 8 minutes. An instant-read thermometer should read 175° to 180°F at this point. Don’t let the sauce overheat or boil, or it will curdle.  Immediately strain the custard into the cold cream in the ice bath. Press firmly on the basil leaves in the strainer with the spatula to extract as much flavor as possible.

• Cool the custard to below 70°F by stirring it over the ice bath. Stir the strawberry puree into the cooled custard.

NOTE: Refrigerate the custard until completely chilled, at least 4 hours. Then freeze the custard in your ice cream maker according to the manufacturer’s instructions. Transfer the just-churned ice cream to an air-tight container, and freeze for at least 4 hours or up to 2 weeks.

A few other flavors from my collection…

5413CS-111-Edit-EditExtra Dark Chocolate Sorbet

8611CI-116Cinnamon

70611IC-106Honey Lavender

Tell me… what’s your favorite ice cream flavor?

Berry season, sweet berry season

Oregon Strawberries

fresh strawberry jam

If you’re planning a trip to Oregon, a great time to visit is early June when the strawberries are in season. The sweetest berries ever are grown in Oregon. Thanks to the long mild spring and early summer climate, strawberries are sweet, red,  juicy and delicious. Lots of rain, cool nights and warm sunny days seem to make for perfect strawberries. The berries stay on the vine and ripen slowly, allowing the sugars to increase before harvest. Keeping up with the short, fast paced strawberry season is challenging, but I did manage to turn a flat of Oregon Hood strawberries into a few dozen jars of jam before they disappear. It’s a good thing berries can be preserved in so many forms to prolong their edible lives.

I’m adapting to a new summer schedule, or actually, absence of a schedule. Even our doggies are sleeping in a bit later. They run around outside all day and are completely worn out by night time. I didn’t think this was possible for Bleu, our overactive border/aussie mix puppy. There’s finally hope for my ability to catch up on much needed sleep. I’m not a morning person, so it was a little disconcerting when I first realized we had adopted a morning puppy. If Bleu had the ability to whistle, that’s what he’d be doing each and every 6 am. Since whistling is not an option, he pounces on us wagging his entire body, as if to tell us it’s the most amazing day ever, and we need to get up so we don’t miss a second of it.

Meet Bailey (left) and Bleu. Sister and brother from another Mother. Bailey has never met a person she doesn’t love, but doesn’t love dogs (she tolerates her brother). Bleu is suspicious of everyone, with the exception of his pack and a few other people he’s accepted as friends, but he loves dogs.

122512C-265

I made these berry tarts a few months ago long before berry season started. You can make the shells days in advance of the custard filling. I like desserts that allow me to do things in steps so they seem much less time consuming. The custard can also sit covered in the fridge for a day or so. Just add the freshly washed fruit, and whatever other toppings float your boat, just before serving. In my opinion, raspberries are even better on these than. Because of their delicate, soft texture and hollowness, they’re easier to eat than strawberries.

22413BT-294

22413BT-266

Start by making the tart shells. If you find this is enough baking for one day, you can freeze the shells for later use. If you’re feeling energetic, continue on…

22313BT-176

Unlike a pie shell, a tart’s shell texture is more like a shortbread cookie. It has to be sturdy enough to cradle its contents without crumbling.

Create the custard filling.

22313BT-240

You can freeze the tarts at this stage for several months. But don’t wait that long, cause you’ll miss out on the fresh berry season.

The original recipe for these tarts was taken from the Miette cookbook written by the owner of Miette Pastry Shop based in San Francisco. I’ll be visiting them next month to do a little sample tasting.

Fresh Fruit Tarts with Pastry Cream
Makes ten 3 1/2 inch or two 7-inch tarts

(a slightly modified recipe from Miette pastry shop in San Francisco)

Pastry Shells:
3 1/3 cups all-purpose flour
1/4 cup sugar
1/2 teaspoon salt
1 cup cold unsalted butter, cubed
2 large egg yolks
6-8 Tablespoons heavy cream
1. Combine the flour, sugar and salt in the bowl of a stand mixer. Mix on low speed for 30 seconds using your paddle attachment. Add the cubed butter and beat until the mixture is as fine as cornmeal (about 5 minutes).

2. In a separate bowl, whisk together the egg yolks and 2 tablespoons of the cream. Add this to the flour mixture in the mixer bowl and mix it all until just combined. Add more cream 1 tablespoon at a time until the dough comes together into large chunks. Gather the dough into a ball, pat it into a disk and wrap it tightly in plastic wrap. Refrigerate for at least 30 minutes.

3. Divide the dough to make the portions you need and pat gently into disks. Roll out each dough disk on a lightly floured surface to about 1/4 inch thick and 1 inch larger in diameter than the pans you’re using. Drape the rolled-out dough into the tart pans, gently pushing it into the bottom edges and against the pan sides to make a strong, straight shell. Trim the edges flush with the top rim of the pans. Prick all over the bottom with a fork and place them in the freezer for 30 minutes.

4. Preheat the oven to 350°F. Bake the shells for 20-25 minutes or until golden brown. Cool in the pan, remove and cool completely on a wire rack before filling.

Pastry Cream:
2 cups whole milk
1/2 vanilla bean
7 large egg yolks
1/2 cup sugar
2 Tablespoons cornstarch
2 Tablespoons unsalted butter, room temperature

1. Pour the milk into a medium saucepan. Use a sharp knife to slit the vanilla bean lengthwise and scrape the seeds into the milk. Throw in the pod. Heat until almost boiling (bubbles will begin to form at the edges). Remove from heat, cover and let steep for 1 hour.

2. In a medium bowl, whisk together the egg yolks, sugar and cornstarch until smooth. Set the bowl on a kitchen towel or nonskid surface and whisk the egg mixture while pouring about 1/2 cup of the hot milk into the mixture to temper. Gradually pour in the rest of the milk, whisking constantly. Pour the contents of the bowl into the pan and turn the heat to medium-low.

3. Cook, whisking constantly until the mixture thickens and comes to a slow boil, about 2 minutes. Immediately strain the cream through a fine-mesh sieve into a clean container. Discard the vanilla bean. Let the pastry cream cool to room temperature, for about 10 minutes, then whisk in the butter until it’s completely incorporated.

4. Cover the pastry cream with plastic wrap, pressing the plastic wrap directly onto the surface of the cream to prevent a skin from forming. Refrigerate until well chilled, at least 1 hour and up to 3 days.

Final assembly: Divide the chilled custard among the shells evenly. Top with blueberries, raspberries, strawberries, or your favorite fruit. Make sure to wash the fruit just before placing it onto the cream filling so that it stays firm and fresh.

22313BT2-118

Next up: blueberries. Ready. Set. Start your tarts.